A couple of weeks ago I installed a new cartridge. The Ortofon MC Vivo Blue was getting a bit long in the tooth, so when I got the chance to buy an unused Nagaoka MP11 Permalloy cartridge for under £40 including postage, I grabbed it with both hands. I wasn't kidding myself that the MP11 would be in the same league as the Vivo Blue, but I had heard that it's a very well regarded cartridge.
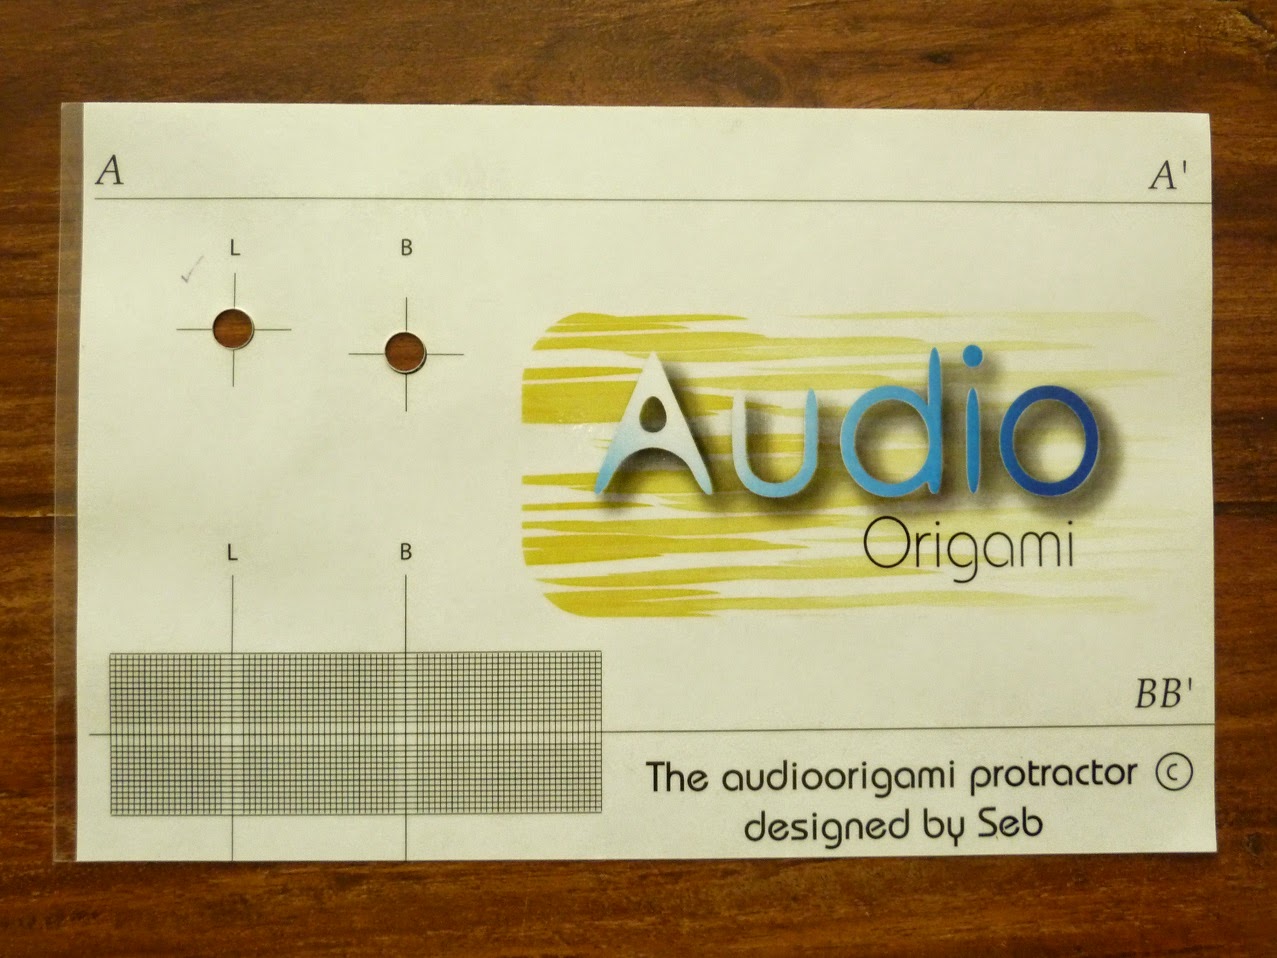
Crucially, the Nagaoka is a breeze to install and set up. Even the fiddly little nuts and bolts that secure the cartridge to the tonearm's headshell didn't present too much of a problem once I stumbled on the idea of lightly pushing the nuts into a blob of Blu Tac to hold them steady while I tightened the bolts. Fingers are not made small enough to get a grip on these things, and I don't trust myself with tweezers so close to a delicate cartridge assembly. I have a selection of cartridge alignment tools, all of which leave me bellowing expletives like a scalded Wookie with Tourette's. They piss me off royally! All of them that is except my simple, laminated paper, Audio Origami protractor designed by someone called Seb. If you ever read this Seb, thank you! More info on which set-up tool might work best for you can be found at
vinylengine.
I won't go into all the tedious detail of how to install and set up a phono cartridge because other people are better qualified than me to bore and baffle you with all that VTA and azimuth stuff. If you make sure your tonearm is parallel to the surface of your records when you play them, check that your stylus is perpendicular to the vinyl when it sits in the groove, and ensure that your tracking force is set somewhere in the middle to the upper end of the recommended range in order to minimise record wear, then you won't go far wrong. No piece of expensive kit is as essential to successfully setting up your cartridge as your eyes and your ears. If it looks out of whack or sounds like crap, tweak it until it doesn't.
Whenever I install a new cartridge on one of my turntables, I have a selection of go-to albums that I use to put it through its paces. Obviously, when choosing your go-to LPs you want records that you know really well otherwise you'll have no idea how well the cartridge is presenting the music in the grooves. You will also want to chuck a few challenges in the cartridge's way to see how well it copes. I sometimes use my Shure Audio Obstacle Course LP to see how well a new cartridge acquits itself, but with the best will in the world, it doesn't exactly make for an enthralling listen. Here then are some of the records that I use to test my cartridge set-up:
Roger Waters - Amused To Death
This is a beautifully produced album with a three dimensional soundstage. Apart from the wealth of musical talent on show, the cartridge has to cope with presenting everything from quietly spoken narration and the distant barking of a dog to the sound of a cataclysmic explosion. I always forget when the explosion is coming and it scares the beejesus out of me every time. Even with the demands that it places on a phono cartridge, it's terrifyingly realistic.
Queen - The Game
Inner Groove Distortion (IGD) is your worst enemy. In an ideal world every side of vinyl would end with a nice mellow acoustic instrumental number so that your cartridge never has to break into a sweat during those cluttered side-ending grooves. Save Me can sound shrill and distorted at the top end with a poorly set-up or underperforming cartridge: those high-pitched, massed harmony vocals are a real test. John Deacon's bass sound is magnificent throughout the album and is reason enough to give The Game a spin.
Ted Nugent - Ted Nugent
Robin Trower - Bridge Of Sighs
Ted Nugent's solo debut and
Bridge Of Sighs are always early visitors to the turntable when I install a new cartridge because, for me, they perfectly encapsulate that warm analogue sound that a digital set-up has no chance of replicating. These albums are a perfect complement to a
vintage system, especially one that features a tube amp and British speakers.
Pollution - II
Confusingly,
this is the band's third album. Pollution's lead vocals are generally
handled by Dobie Gray (best known for his solo hits
The In Crowd and
Drift Away), but
Foolhearted Woman features the soulful Joplinesque shriek of T
áta.
That banshee wail, high and hot backing vocals that tip well into the
red, a slab of vinyl that has seen years of hard service, and the fact
that this song is a side-closer all conspire to make this a bitch for a
cartridge to track. A good cartridge, well set up, will dig through any
record wear and find the undamaged portion of the groove. The MP11 is
clearly a good cartridge.
Billy Joel - The Nylon Curtain
Much like Queen's Save Me, Joel's Goodnight Saigon, coming at the end of a side as it does, and featuring a massed chorus of vocals, can sound like an indistinct mush if your cartridge isn't up to the challenge. The Ortofon cart treated this supposed challenge with contempt, sounding as sweet on the inner grooves as on the opening track. I wasn't expecting the Nagaoka to emerge from this particular challenge with its dignity intact, but it copes admirably. It's possible to make out the individual voices that make up the football terrace chant of "we'd all go down together".
Fleetwood Mac - Rumours
Christine McVie's vocals on Songbird can be a real test for a cartridge, often falling victim to sibilance and distortion. The MP11 pretty much avoids this pitfall and does a fine job of picking out the subtle acoustic guitar underlying the piano. Apart from anything else, this is an album that has continued to rise in my estimation over the years. It's such a beautiful collection of songs. I really can't pick a favourite between the Peter Green and the Buckingham / Nicks eras.
Godley & Creme - Consequences
This is a weird and, at times, wonderful album. I'm not sure that I've ever got through it all in one sitting, but one track pulls me back in time and time again.
The Flood is like beautiful, sonic water torture, building from a single repeated drip to the titular inundation, with some heavy guitars along the way. When I think I have my cart set up just right, I sit back and let this track, quite literally, wash over me.
Pentangle - The Pentangle
Folk music has to be sufficiently far removed from its hey-nonny-nonny, finger in the ear, Morris dancer-soundtracking norm to find favour round here, but something of the quality of Pentangle's debut album has an open invitation chez Shelf-Stacker. If you want to know what it would sound like to have Danny Thompson playing his double bass in your front room, get your cartridge properly installed, drop the stylus on the last track on side one (
Pentangling) and prepare for your jaw to hit the floor. You can almost hear the calluses on Danny Thompson's fingers. Gobsmacking!
Once I'm feeling suitably smug and contented with the sounds being conjured from the grooves by my newly installed cartridge, nothing can beat prolonged immersion in Pink Floyd, The Alan Parsons Project or some early Sabbath.
If you purchase a Nagaoka MP11, one thing you will notice is how much the sound changes and improves after a running-in period of thirty hours or so. After this time there is an almost immediate smoothing off of any rough edges and a general improvement in the over-all refinement of the sound. Any harshness is tamed, the bass becomes more defined, and you stop listening to the cartridge and begin losing yourself in the music - which is how it should be. So, how does the MP11 compare to the Ortofon that it replaced? Well, the first thing you notice about this cartridge is how bleeding beige and ugly it is. It reminds me of an oatmeal-coloured Lada Estate that my mum used to drive. Its unsexy blockiness does however make it very easy to align. The MP11 provides less detail in the mid-range and is not as forward in its presentation as the Ortofon, but apart from that I'm struggling to find any glaring flaws in its performance. It tracks beautifully and is forgiving of less-than-pristine records. I certainly don't feel like I'm slumming it with this highly affordable cartridge and I doubt it will be the last Nagaoka cartridge that I buy.